ACA Capture Pro Online Help
ACA Capture Pro - Capture screen images, web pages, Flash, icon, menu from your Windows PC even those hard-to-grab DirectX, Direct3D games or video player, create videos of your computer screen.
Output Menu

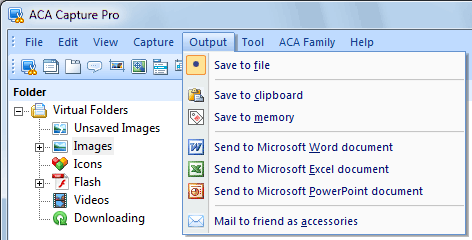
Screenshot: The Output menu of ACA Capture Pro
- Save to file: The captured screenshot will be saved as a file. The default save format is BMP (Bitmap format), you can change the image format by clicking menu Tools | Options | Save. As the compression of BMP to JPG/JPEG/PNG/TIF/GIF file will occupy more CPU times, if you want capture faster, we recommend you to choose BMP format.
- Save to clipboard: Send the captured screenshot to the Windows clipboard, it can be put in different Windows programs.
- Save to memory: The captured screenshot will be saved to memory, click the Unsaved Images item on the Folders tree for listing these images, you can view, save, print, copy or delete them. Application will pop a notify message to you if they haven't been saved when you are ready to exit the application.
- Send to Microsoft Word document: Send captured screenshot to Microsoft Word document. If your computer does not install Microsoft Word, the menu item will be grayed. It is only supported if Microsoft Word 2000(or later) has been configured.
- Send to Microsoft Excel document: Send captured screenshot to Microsoft Excel document. If your computer does not install Microsoft Excel , the menu item will be grayed. It is only supported if Microsoft Excel 2000(or later) has been configured.
- Send to Microsoft PowerPoint document: Send captured screenshot to Microsoft PowerPoint document. If your computer does not install Microsoft PowerPoint, the menu item will be grayed. It is only supported if Microsoft PowerPoint 2000(or later) has been configured.
- Mail to friends as an attachment: Mail the captured screenshot to friend as an attachment. It is only supported if you have a 32-bit MAPI mail client installed (e.g., Microsoft Outlook Express).
The completed image files lists in Images folder.
Most Windows programs accept data pasted from the clipboard, you can use Ctrl+V or the menu selection Edit | Paste.
TIPS: When you select Microsoft Office(Word, Excel or PowerPoint) document as the output option, you can adjust the settings by clicking menu Tools | Options | Office.
TIPS: You can type the E-mail address of each recipient by clicking menu Tools | Options | Save, application will auto fill these addresses to mail recipient.
